

Introduction
Last week, a frantic client called me. “Our multihead weigher is suddenly giving away product! Every bag is overweight by 5-10 grams, and we’re losing thousands of dollars a day. Can you get here immediately?”
I’ve seen this scenario play out countless times. An inaccurate multihead weigher is one of the most stressful problems in the packaging industry. It doesn’t just erode profits; it can lead to customer complaints, regulatory fines, and even production shutdowns. Based on my 10years of experience, over 90% of these weighing inaccuracies are caused by just seven key components. Today, I’m sharing that experience to help you quickly diagnose and resolve these issues, turning a crisis into a manageable task.
Quick Diagnosis Flowchart
Before diving deep into component-level issues, use this flowchart to quickly narrow down the potential cause of the inaccuracy. This process should be your first line of defense.

7 Key Parts to Check When Your Multihead Weigher is Inaccurate
Here are the seven most common culprits behind multihead weigher accuracy problems, ordered from most to least frequent. We’ll cover how to identify the issue, what causes it, and how to fix it.
1. Load Cell
The load cell is the heart of the multihead weigher. It’s a highly sensitive transducer that converts the force of the product’s weight into an electrical signal. Even a minor malfunction can lead to significant weighing errors. It is, by far, the most common reason for inaccuracy.
How to Diagnose:
- Consistent Errors on One Head: If you notice that one specific weigh head is consistently over or under weight, the load cell is the primary suspect.
- Failed Calibration: During calibration with a standard weight, if a head fails to register the correct value or shows erratic readings, its load cell is likely faulty.
- Physical Inspection: Look for any signs of physical damage, corrosion, or loose wiring on the load cell and its connections.
Common Causes:
- Overload: Dropping a heavy object onto the weigher or exceeding its maximum weight capacity can permanently damage the load cell.
- Moisture/Corrosion: In humid environments or during washdowns, moisture can seep into the load cell, causing corrosion and electrical shorts.
- Fatigue: Like any mechanical component, load cells have a finite lifespan and can fail after millions of weighing cycles.
How to Fix: Replacing a faulty load cell is often the only solution. While it may seem daunting, it’s a straightforward process for a trained technician.
Case Study: A potato chip factory was experiencing intermittent accuracy issues. Our technician traced the problem to the load cell on head #5, which had been damaged by moisture during aggressive cleaning. After replacing the load cell and advising the client on proper cleaning procedures, the weigher’s accuracy was restored, saving them from ongoing product loss.
If you’ve determined a load cell needs replacement, we offer high-quality, compatible load cells for major brands like Ishida, Yamato, and Kenwei. Click here to view our selection of load cells.

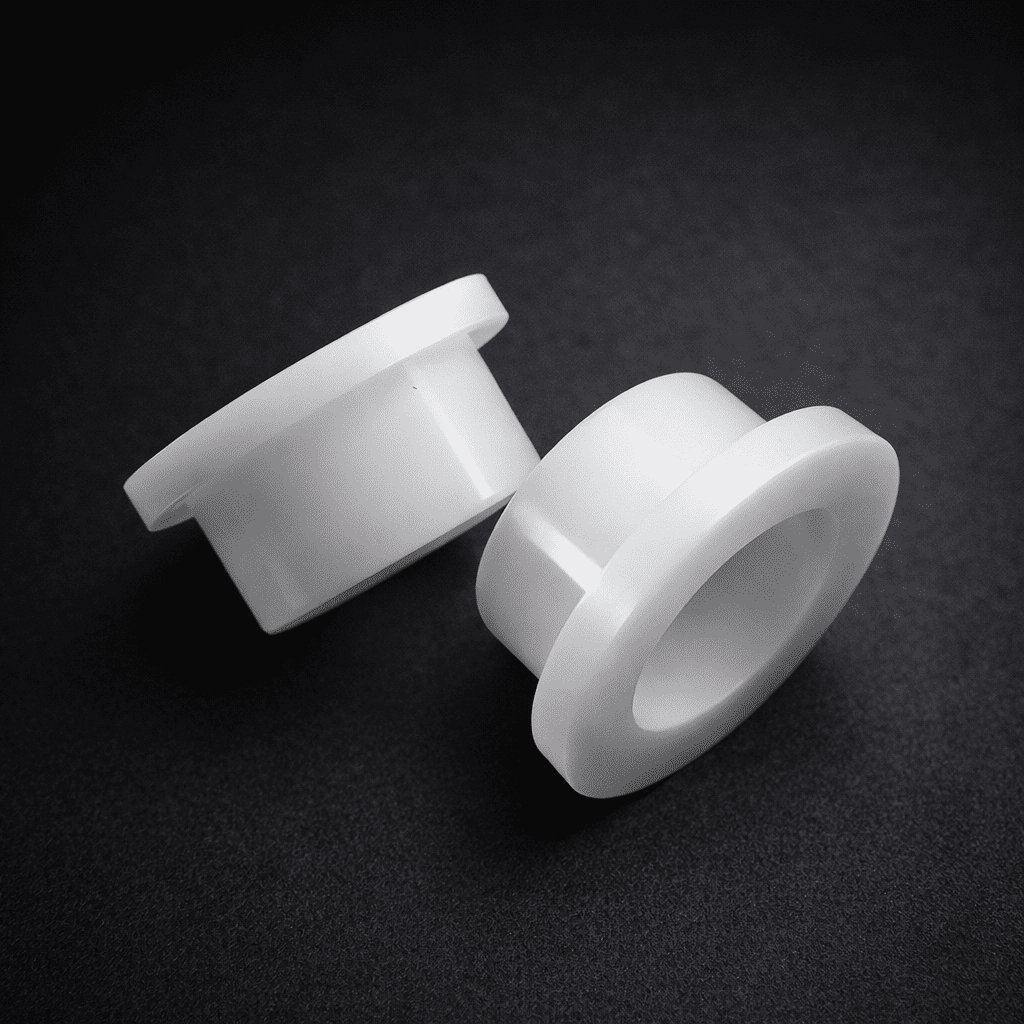
2. Hopper Door Springs and Bearings
The small springs and bearings that control the hopper doors play a surprisingly large role in weighing accuracy. If a door doesn’t open or close crisply and completely, product can be trapped or discharged at the wrong time, throwing off the measurement.
How to Diagnose:
- Observe Door Action: Watch the hopper doors operate. They should snap open and shut instantly. Any sluggishness, hesitation, or incomplete closure is a red flag.
- Listen for Noise: Grinding or squeaking sounds can indicate a failing bearing.
- Manual Check: With the machine off, manually open and close the hopper doors. You should feel smooth, consistent tension from the spring. Any binding or looseness points to a problem.
Common Causes:
- Spring Fatigue: Springs lose their tension over time and can no longer shut the door with enough force.
- Bearing Contamination: Product dust and cleaning solutions can wash out the grease in bearings, leading to corrosion and seizure.
- Physical Damage: A bent linkage or damaged spring can impede door movement.
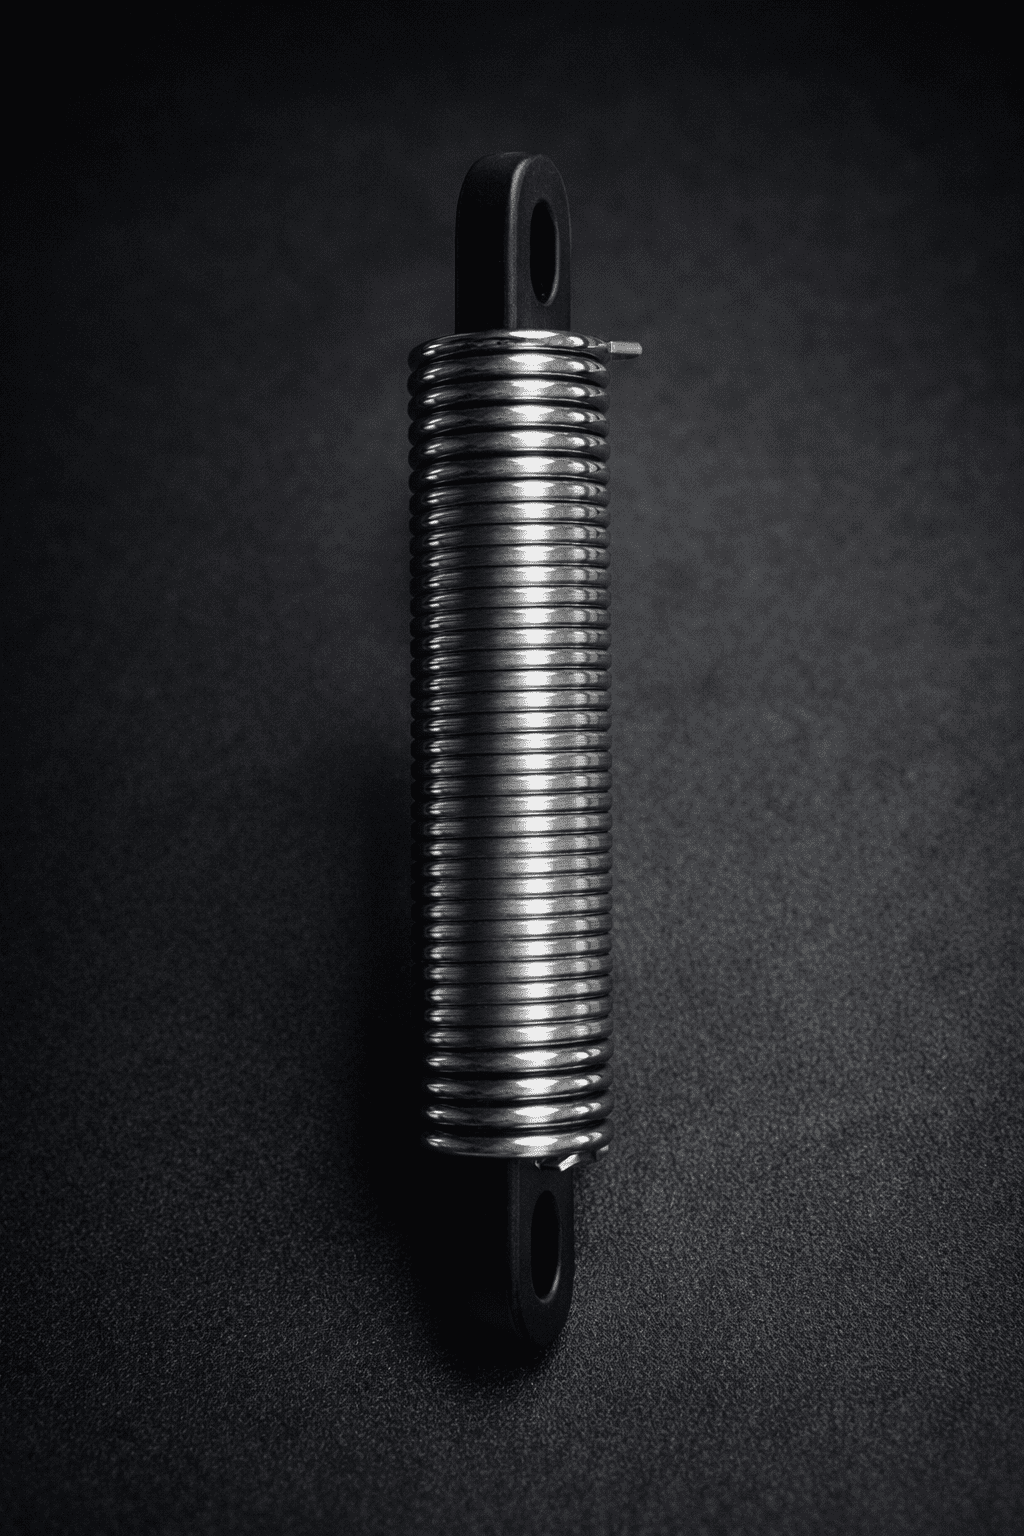
How to Fix: Replacing springs and bearings is a simple and inexpensive fix. Most manufacturers include a set of spares with a new machine. It’s good practice to replace them proactively as part of your regular maintenance schedule.
Pro Tip: When a hopper door fails to open correctly, it often leads to an “underweight” error for that cycle. When it fails to close correctly, it causes product to fall into the weigh bucket after the measurement is taken, leading to an “overweight” final bag. Tracking the type of error can help you pinpoint the cause
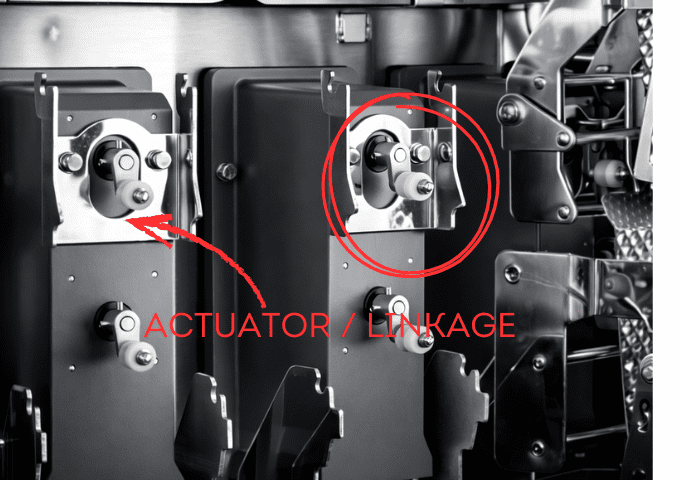
3. Actuator / Linkage Mechanism
The actuator, often a small motor or solenoid, is what drives the linkage mechanism (crank) to open and close the hopper doors. If the actuator is weak or the linkage is out of alignment, the door won’t function correctly, leading to the same issues caused by bad springs or bearings.
How to Diagnose:
- Inconsistent Reset: Observe the linkage mechanism after it operates. It should return to the exact same starting position every time. If it fails to reset properly, it’s a primary indicator of a problem.
- Sluggish Movement: The actuator should move the linkage with a quick, decisive motion. Any slowness can point to a failing motor or a mechanical obstruction.
- Swap Test: If you suspect a faulty actuator or its control board, you can swap the components (actuator motor or the driver board) with an adjacent, properly functioning head. If the problem moves with the component, you’ve found the culprit.
Common Causes:
- Motor Failure: The small motors that drive the mechanism can burn out or lose torque over time.
- Misalignment: Physical shock to the machine or improper reassembly after maintenance can knock the linkage out of alignment, causing it to bind.
- Driver Board Failure: The electronic board that controls the actuator motor can fail, sending incorrect signals or insufficient power.
How to Fix: First, check for any obvious mechanical obstructions or misalignments. If the mechanism is clear and aligned, the issue is likely the motor or the driver board. The swap test is the most effective way to determine which one needs to be replaced.
4. Photoelectric Sensor
Photoelectric sensors are used to detect the presence or absence of product in the feed funnels or hoppers. If a sensor is dirty or faulty, it can send incorrect information to the weigher’s control system, leading to incorrect feeding and, consequently, inaccurate weights.
How to Diagnose:
- False Signals: The weigher’s control panel may show a hopper as full when it’s empty, or vice versa. This is a classic sign of a sensor issue.
- Visual Inspection: Check if the sensor’s lens is obscured by dust, grease, or product residue. A dirty lens is the most common problem.
- LED Indicator: Most photoelectric sensors have an indicator light that turns on when the beam is broken. Test the sensor by placing an object in its path and see if the light responds correctly.
Common Causes:
- Contamination: Dust and residue buildup on the sensor lens is the number one cause of failure.
- Misalignment: The emitter and receiver can get knocked out of alignment, preventing the beam from being detected correctly.
- Electrical Failure: The sensor itself can fail electronically over time.
How to Fix: First, always try cleaning the sensor lens with a soft, clean cloth. If cleaning doesn’t solve the problem, check the alignment. If the sensor is still malfunctioning, it will need to be replaced. Replacement is typically a simple plug-and-play operation.
5. Hopper Control Board
Each weigh hopper often has its own small circuit board that processes the signal from the load cell and communicates with the main CPU. While durable, these boards can fail, leading to a single head becoming completely unresponsive or providing erratic data.
How to Diagnose:
- Total Head Failure: If a single head stops working entirely—no weight reading, no door action—the control board is a likely suspect, assuming the power connections are secure.
- Swap Test: The most definitive test is to swap the control board with one from a known working head. If the problem follows the board, you have confirmed the failure.
- Visual Inspection: Look for any burnt components, loose connections, or signs of corrosion on the board.
Common Causes:
- Power Surge: A voltage spike can fry sensitive components on the circuit board.
- Moisture Damage: As with other electronic components, moisture is a primary enemy.
- Component Failure: Over time, individual electronic components like capacitors or processors can simply wear out.
How to Fix: Once a board is confirmed to be faulty via a swap test, replacement is the only option. These boards are specific to the weigher model and must be sourced from a reliable supplier.

6. Vibratory Feeder / Infeed System
Inconsistent product feeding is a major, yet often overlooked, cause of inaccuracy. The goal is to have a consistent, even flow of product to each weigh hopper. If the central vibratory feeder (cone) or the linear vibratory feeders are not tuned correctly, some hoppers will get too much product and others too little, making it impossible for the weigher to find a good weight combination.
How to Diagnose:
- Uneven Product Distribution: Visually inspect the flow of product. Is it cascading evenly down the central cone and along the linear feeders? Or is it clumping and favoring one side?
- Starved or Overfilled Hoppers: The control system may report frequent “hopper empty” or “hopper overfill” alarms, indicating a feeding problem.
- Inconsistent Amplitude: Listen to the hum of the vibrators. It should be a steady, consistent tone. A change in sound can indicate a problem with the vibrator unit.
Common Causes:
•Incorrect Settings: The amplitude and timing settings for the vibrators are highly dependent on the product. Using the wrong settings for a new product is a common mistake.
•Mechanical Obstruction: Product buildup or foreign objects can interfere with the vibration.
•Failing Vibrator Unit: The electromagnetic coil in the vibrator unit can weaken or fail over time.
How to Fix: First, ensure the entire infeed system is clean. Then, consult your machine’s manual to properly tune the vibration amplitude and timing for your specific product. This is more of a tuning process than a repair. If tuning doesn’t work, the vibrator unit itself may need replacement.

7. Hopper (Itself)
Finally, the physical condition of the weigh hoppers and pool hoppers themselves can affect accuracy. While they are simple stainless steel buckets, damage or modification can cause problems.
How to Diagnose:
- Visual Inspection: Look for dents, warping, or any damage that could cause product to stick or not discharge cleanly.
- Sticky Residue: Some products can leave a sticky film on the hopper surface, which builds up over time and affects weight.
- Incorrect Hopper: Ensure the correct type and size of hopper is installed for the product being run. Using a hopper designed for dry goods with a sticky product can cause issues.
Common Causes:
- Physical Damage: Dropping a hopper during cleaning or an impact from a foreign object can dent or deform it.
- Improper Cleaning: Using abrasive materials for cleaning can scratch the surface, creating places for product to stick.
- Wear and Tear: Over years of use, the surface can become worn, losing its smooth finish.
How to Fix: If a hopper is significantly damaged, it should be replaced. For issues with sticky residue, specialized non-stick coatings (like Teflon) can be applied, or you may need to switch to hoppers with a dimpled or embossed surface designed for such products.
Explore our variety of replacement hoppers and coated options to find the perfect match for your product.

Environmental and External Factors
Sometimes, the problem isn’t with the weigher itself, but with the environment it’s operating in. Before you spend hours troubleshooting components, it’s wise to rule out these external factors.
- Vibrations: A multihead weigher is an extremely sensitive instrument. Vibrations from nearby machinery, forklifts driving by, or even an unstable mounting frame can introduce errors into the weight readings. Ensure the weigher is on a dedicated, stable platform, isolated from other sources of vibration.
- Air Drafts: Strong air currents from HVAC systems, open doors, or fans can exert pressure on the weigh buckets and affect accuracy. If possible, shield the weigher from direct drafts.
- Power Supply: Unstable voltage or electrical noise on the power line can interfere with the sensitive electronics. A dedicated power line with a good quality surge protector or a power conditioner is highly recommended.
- Temperature and Humidity: Extreme fluctuations in temperature and high humidity can affect the performance of electronic components, especially the load cells. Maintain a stable and controlled environment where possible.
Preventive Maintenance for Long-Term Accuracy
Fixing a problem is good, but preventing it is better. Implementing a regular preventive maintenance schedule is the most effective way to ensure your multihead weigher remains accurate and reliable for years to come.
Daily Checks :
- Cleanliness: Ensure all product contact surfaces (hoppers, feeders, chutes) are clean and free of residue.
- Visual Inspection: Take a quick look for any obvious damage, loose parts, or disconnected wires.
- Zero Calibration: Perform a zero calibration at the start of every shift.
Weekly Checks :
- Full Calibration: Calibrate all heads using certified standard weights.
- Check Door Action: Manually check all hopper doors for smooth and complete operation.
- Inspect Sensors: Clean and test all photoelectric sensors.
Monthly/Quarterly Checks :
- Inspect Wiring: Check for any frayed or damaged wiring, especially around moving parts.
- Check Mechanical Fasteners: Ensure all nuts and bolts are tight.
- Review Error Logs: Analyze the machine’s error logs to spot any recurring issues with a specific head that might indicate a developing problem.
By investing a small amount of time in maintenance each week, you can save countless hours of downtime and thousands of dollars in product giveaway.
Conclusion: Your Partner in Packaging Precision
An inaccurate multihead weigher can be a major source of frustration and financial loss, but it’s a solvable problem. By systematically working through the potential causes—from external factors like vibration to internal components like load cells and actuators—you can effectively diagnose and repair the issue. The seven key components discussed here are responsible for the vast majority of accuracy problems.
Remember that proactive, preventive maintenance is your best defense against unexpected downtime. A clean, well-calibrated, and regularly inspected machine is a reliable and profitable machine.
If you’ve gone through this guide and still need assistance, or if you’ve identified a faulty part that needs replacing, we are here to help. With a comprehensive inventory of high-quality spare parts and a team of experienced technicians, we can provide the components and expertise you need to get your production line back to peak performance.
Don’t let inaccuracy eat into your profits. Contact us today for expert advice or browse our full range of multihead weigher parts.