

Introducción
Un elevador de cangilones se detiene cuando falla un componente, no cuando fallan varios, sino cuando falla uno solo. El cangilón que se agrieta por el orificio de fijación. La cadena que se ha estirado más allá de su límite de servicio. La rueda dentada con perfil de diente en forma de aleta de tiburón ya no puede sujetar la cadena bajo carga.
Ninguno de estos fallos es repentino. Todos se desarrollan gradualmente y producen señales de advertencia que son detectables con una rutina de inspección básica. El problema es que la mayoría de las instalaciones no tienen un proceso de inspección estructurado para las piezas de los elevadores de cangilones: el elevador se trata como infraestructura en lugar de como una máquina con un programa de mantenimiento.
Esta lista de verificación abarca los tres componentes principales de un elevador de cangilones: cangilones, cadena y piñones, y te ofrece un protocolo de inspección práctico para cada uno, incluyendo las mediciones específicas que te indican si un componente tiene vida útil restante o necesita ser reemplazado.
Para la gama completa de piezas de repuesto: Buje del elevador de cangilones.
Sección 1 — Cómo funciona un elevador de cangilones
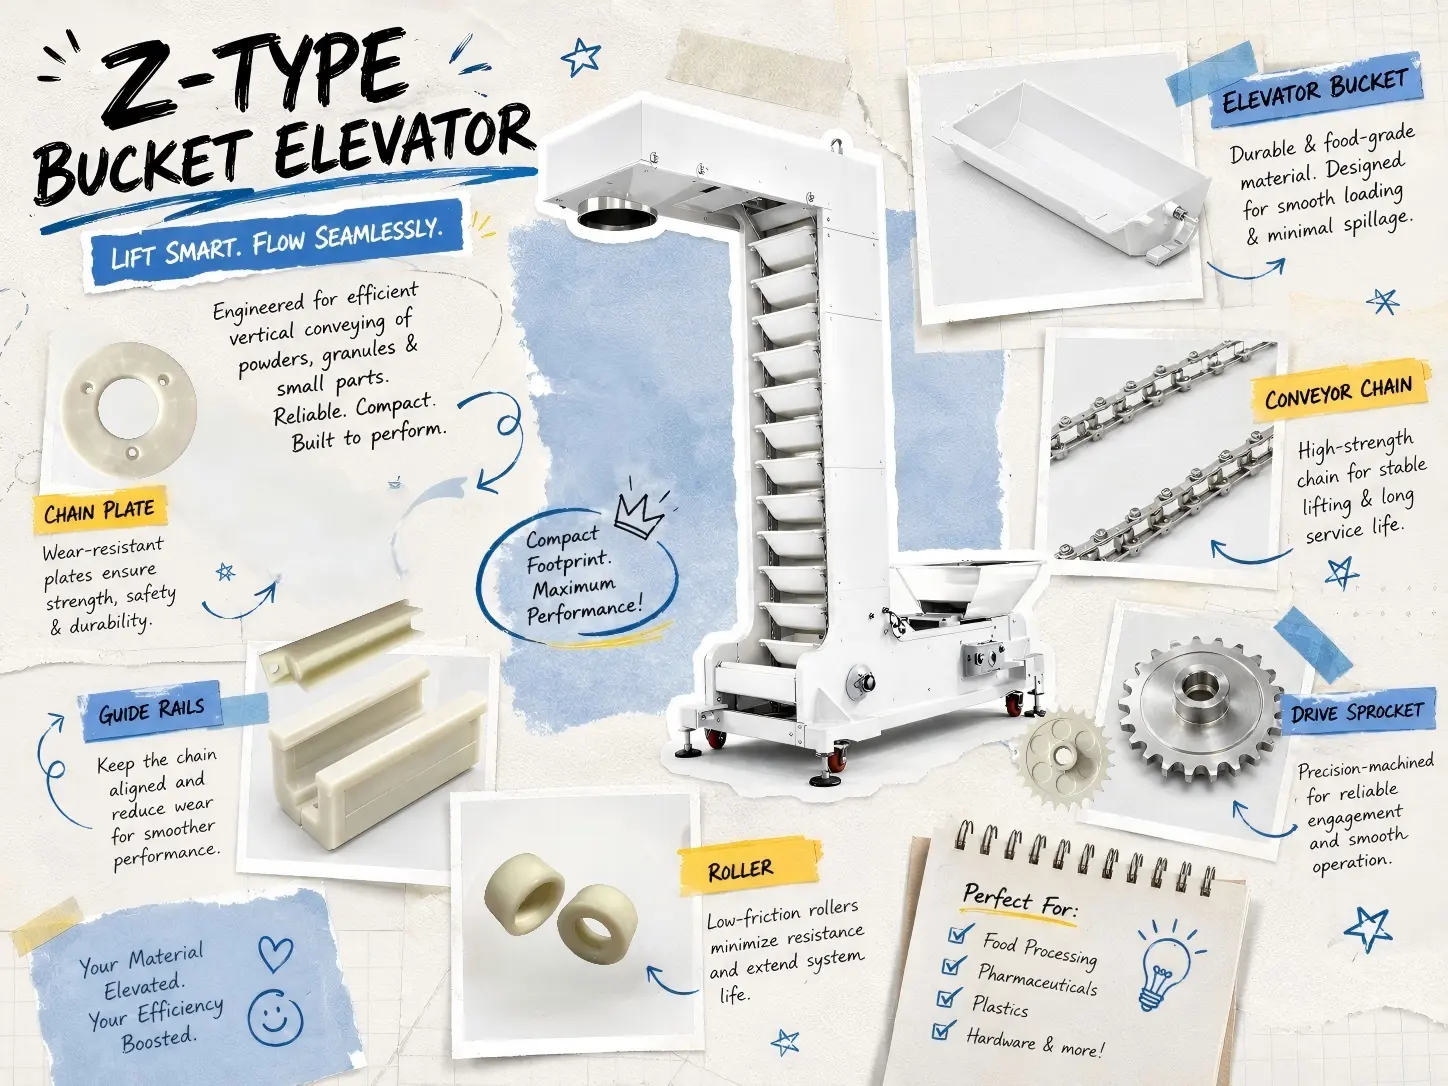
¿Cómo funciona un elevador de cangilones? Los tres componentes principales
Un elevador de cangilones tipo Z funciona con un principio simple: los cangilones unidos a una cadena continua recogen el producto en la parte inferior (el pozo), lo transportan hacia arriba y lo descargan en la parte superior (la cabeza) a través de la fuerza centrífuga o la gravedad a medida que los cangilones giran alrededor del piñón superior. Tres componentes hacen que esto funcione, y los tres se degradan con el tiempo.
| Componente | Función | Modo de Fallo Primario | Consecuencia |
| Alzas para elevador | Llevar producto del maletero a la cabeza en cada ciclo | Agrietamiento en los orificios de montaje; desgaste superficial; deformación | Derrame de producto; peso de llenado inconsistente en la báscula aguas abajo |
| Cadena de rodillos transportadores | Conecta y espacia tolvas; transmite fuerza motriz | Elongación (desgaste del casquillo del pin); agarrotamiento del rodillo; fatiga de la placa | Diente trepando en el piñón; salto de cadena; parada de línea completa |
| Piñones de cadena | Engancha la cadena; transmite el par del motor al sistema | Desgaste del perfil del diente (‘aleta de tiburón’); desgaste del orificio; daño de chaveta | Deslizamiento de la cadena; velocidad irregular; desgaste acelerado de la cadena; parada súbita |
Estos tres componentes forman un sistema. Cuando uno se desgasta más rápido de lo esperado, acelera el desgaste en los otros. Una cadena estirada provoca el subida de dientes en el piñón, lo que acelera el desgaste del piñón, lo que provoca saltos en la cadena, lo que crea cargas de impacto que agrietan los orificios de montaje del cucharón. La lista de verificación aborda los tres juntos.
Sección 2 — Inspección de cangilones de elevador
Lista de verificación de cangilones de elevador: 5 comprobaciones
Comprobación 1: Estado del orificio de montaje
Los orificios de montaje — donde el cucharón se une a la cadena — son el punto de mayor tensión. Las grietas por fatiga se inician aquí porque el orificio concentra la tensión tanto del peso del producto como de la carga de choque cuando el cucharón se llena en la base.
- Cómo comprobar: retire una muestra de cubos (cada 20 cubos como mínimo) e inspeccione el perímetro del agujero con buena iluminación. Pase la yema del dedo por el interior del agujero; una grieta lo suficientemente profunda como para importar suele ser palpable antes de ser visible.
- Reemplace cuando: se vea cualquier grieta en el orificio de montaje, sin importar su longitud. Un orificio de montaje agrietado se propagará hasta la falla total en cuestión de días o semanas bajo carga normal.
Comprobar 2: Deformación de la carrocería
Los cubos se deforman gradualmente bajo carga: la base se hunde hacia afuera, las paredes laterales se expanden. Mida el ancho del cubo en su punto más ancho (dimensión A) y compárelo con la especificación. Una deformación superior a 5 mm de la nominal justifica el reemplazo.
Comprobación 3: Condición de la superficie
En el caso de las cucharas de superficie lisa: las marcas visibles o las rugosidades provocan la adherencia del producto. En el caso de las cucharas de superficie con hoyuelos: si los hoyuelos se han desgastado hasta quedar lisos en más del 20% de la base de la cuchara, se pierde la función antiadherente. Sustitúyalas cuando se observe un residuo apreciable (producto que permanece en la cuchara tras la descarga).
Comprobación 4: Vibración Anormal
Vibración irregular — un golpe o pulso que no se repite a intervalos consistentes — casi siempre significa un cucharón flojo, agrietado o faltante. Detenga el elevador e inspeccione todos los cucharones en busca de hardware de montaje faltante, agrietado o flojo.
Comprobación 5: La especificación de 5 dimensiones (A–E) para solicitar repuestos
Al pedir cangilones de repuesto, confirme estas cinco dimensiones de sus cangilones o planos del elevador existentes:
| Dimensión | Lo que mide | Por qué es importante |
| A — Ancho total | La cara más ancha del cubeta | Debe caber dentro de la carcasa del ascensor sin tocar las paredes |
| B — Profundidad de proyección | Placa trasera a labio de ataque | Determina hasta dónde llega el cucharón en la bota para llenarla |
| C — Profundidad de la cavidad interior | Profundidad interna útil | Determina la capacidad del cubo |
| D — Altura de la placa posterior | Altura de la superficie de montaje plana | Must match the chain attachment geometry |
| E — Hole centre spacing | Distance between mounting holes | Must match the chain bolt pitch exactly — wrong E = bucket cannot be fitted |
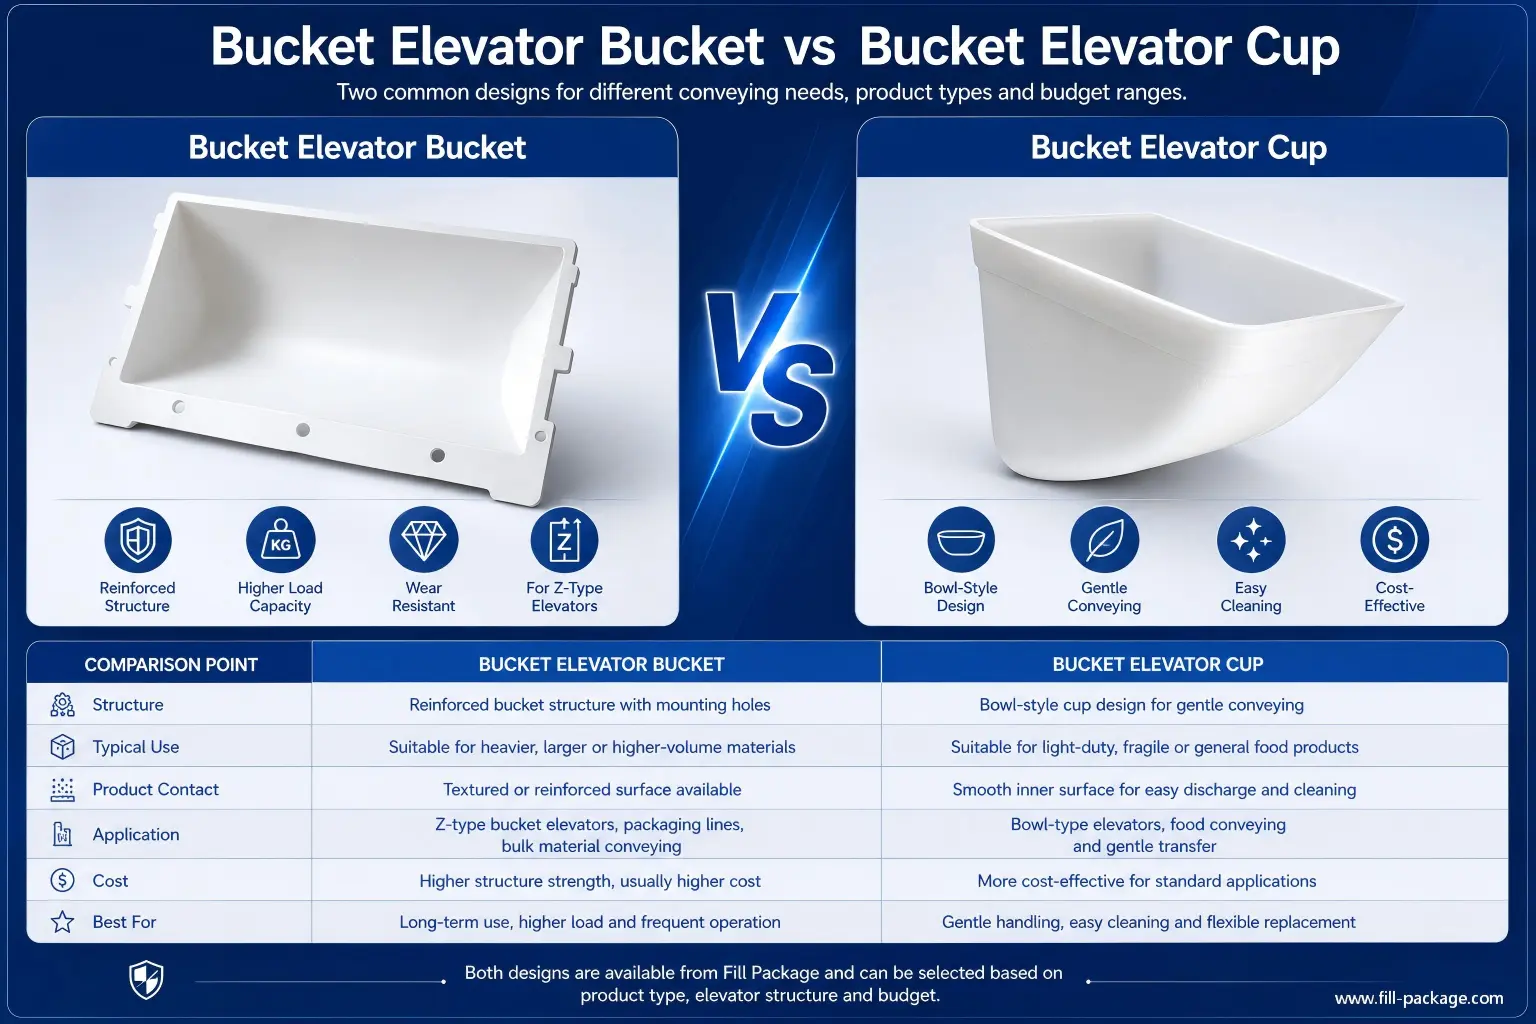
Bucket size charts: Z-Type Elevator Buckets · Tazas de elevadores industriales DS & DQ
Section 3 — Chain Inspection
Conveyor Roller Chain Checklist: 4 Checks
Check 1: The 10-Link Elongation Measurement
Measure 10 consecutive links under light tension. Compare to nominal pitch × 10:
| Tipo de cadena | Nominal 10-link | Monitor closely at | Replace at |
| C2042 (25.4mm) | 254.0mm | 258.1mm (1.5%) | 261.6mm (3%) |
| C2052 (31.75mm) | 317.5mm | 322.3mm (1.5%) | 326.9mm (3%) |
| C2062 (38.10mm) | 381.0mm | 386.7mm (1.5%) | 392.4mm (3%) |
| C2082 (50.80mm) | 508.0mm | 515.6mm (1.5%) | 523.2mm (3%) |
At 3% elongation — replace immediately: The chain no longer matches the sprocket tooth pitch. Tooth climbing begins, creating impact loads that destroy both chain and sprocket rapidly. Do not continue running — the next failure may be sudden.
Check 2: Roller Rotation
With the elevator stopped, press each roller and check it spins freely. A seized roller creates a high-friction drag point that causes rapid wear on both the chain link plate and the carrying roller beneath it. Replace when more than 3 consecutive rollers are seized.
Check 3: Side Plate Condition
Lateral grooves on side plates (from guide rail contact) indicate misalignment or over-tensioning. Replace when any groove exceeds 0.5mm depth, or when fatigue cracking is visible. Resolve the root cause before fitting a new chain.
Check 4: Lubrication and Corrosion
For carbon steel chains: dry pins appear silver-grey rather than oily. Apply food-grade NSF H1 lubricant at the pin-bushing interface. For stainless chains: check for pitting at the pin-bushing interface in aggressive washdown environments.
Full chain specification: Cadena de rodillos transportadores C2052
Section 4 — Sprocket Inspection
Bucket Elevator Sprocket Checklist: 3 Checks
Check 1: Tooth Profile — Shark-Fin Wear
On a new sprocket, each tooth has a symmetrical profile. As it wears, the engagement side erodes into a hooked ‘shark-fin’ shape. A shark-fin tooth cannot seat the chain roller properly — the roller rides up the hooked tip, creating chordal action that cracks bucket mounting holes and accelerates chain elongation.
- Replace when: shark-fin wear is visible on 3 or more consecutive teeth. Always replace chain and sprocket together at this point — new chain on worn sprockets fails within weeks.
Check 2: Bore and Keyway Condition
Attempt to rock the sprocket radially on the shaft with the elevator stopped. Any detectable movement indicates bore wear. Check the keyway for brinelling — indentation marks from repeated shock loading. Replace when any radial movement is detectable.
Check 3: Plastic Sprocket Tooth Height (PA+GF)
For PA+GF plastic driven sprockets, tooth tips wear progressively shorter rather than developing shark-fin profiles. Measure the outer diameter and compare to specification (ø260.29mm for standard C2052-24Z plastic sprocket). Replace when outer diameter has reduced by more than 3mm from nominal.
Sprocket specifications: Ruedas Dentadas para Elevador de Cintas — C2052-24Z
Section 5 — Compatibility Logic
How Chinese Replacement Parts Achieve 100% Dimensional Compatibility
The key insight for sourcing bucket elevator parts from China: bucket elevator components are standardised by dimension, not by brand. The same ANSI chain pitch standards, the same tooth geometry for a given pitch and tooth count, and the same dimensional logic for bucket mounting apply regardless of which country manufactured the original elevator.
When you provide the five bucket dimensions (A–E), the chain pitch, and the sprocket bore diameter, we can confirm compatibility for any replacement part before production. This is the basis of our drawing confirmation process — and the reason our parts fit correctly the first time.
Dimension is compatibility. Brand is not. A Chinese-manufactured replacement bucket, chain, or sprocket confirmed to the correct A–E dimensions and chain pitch will fit and perform identically to the original part — regardless of which country manufactured the elevator.
Section 6 — Maintenance Schedule
Recommended Inspection Intervals
| Frecuencia | Controlar | Componente | Action if Problem Found |
| A diario | Listen for irregular vibration or knocking | Buckets / chain | Stop and inspect at shift end if vibration is severe |
| Semanalmente | Visual bucket inspection for cracks or deformation | Cubos | Remove and replace cracked or deformed buckets immediately |
| Semanalmente | Chain tension — 2–3% sag from sprocket centre distance | Chain | Adjust tension; remove links if elongated |
| Mensual | 10-link elongation measurement | Chain | Order replacement if approaching 2% elongation |
| Mensual | Roller rotation check on accessible chain sections | Chain | Note seized rollers; replace at next chain replacement |
| Mensual | Guide rail wear — groove depth check | Guide rails | Replace rails when groove exceeds 3mm depth |
| Every 3–6 mths | Full bucket sample inspection (mounting holes) | Cubos | Replace batch if cracks found on any sample bucket |
| Every 3–6 mths | Sprocket tooth profile check | Piñones | Replace if shark-fin wear on 3+ consecutive teeth |
| Each chain replacement | Full sprocket inspection | Piñones | Replace worn sprocket — never fit new chain on worn sprocket |
Next Steps
Need replacement bucket elevator parts? Visit our Buje del elevador de cangilones for the complete range — Z-type buckets, DS/DQ industrial cups, bowl-type buckets, C2052 chain, and 24-tooth sprockets. Drawing confirmation before every order. Contacta a nuestro equipo técnico
Continúa leyendo: Original vs. Aftermarket Parts: Why Precision Measurement Is the Key to Compatibility →